Frequent Searches
Frequent Searches
It is known that engines for sports use, and those for the highest performance classes of karting are no exception, are subject to wear, especially in the most stressed components, by friction. In this sense, in KZ engines one of the “weak points” is the clutch, which must be checked frequently. If, in fact, it doesn’t work (it slides or does not come away easily, that is, with the engine running, with the lever pulled, the kart moves), it needs servicing. Similarly, it is necessary to check whether the discs have abnormalities in the friction material (an organic compound that allows the absorbing of a small percentage of impurities without slipping), like a surface ruined because of a stone or non-uniform consumption. In order to service the clutch and transmission more comfortably, our advice is to remove the engine from the kart. Technically, however, the operation can be performed with the engine still mounted. In this article, Doctor TKart uses a IAME - Parilla Shiflter engine, but the procedure is roughly the same for all engines with gears and a dry clutch.

First, use a 14 mm wrench to remove the columns that assure the springs to the pressure plate. To do so, it is necessary for the spark plug to be mounted in such a way that the compression holds the piston still; however, the gear does not need to be engaged. Having removed the springs, the plate can be removed from its housing. Then, tilting the engine, the set of driven and driving clutch plates must be removed (it is obvious how performing this with the engine mounted is much more difficult).
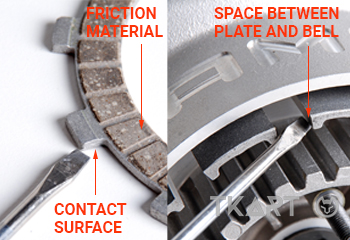
Divide up the driving plates (coated with friction material) and the driven plates (uncoated) on the work top to check them out. As regards the first, you must check that the friction material is uniform and not excessively consumed, and that the bearing surface between the disc and the bell is not deformed because of the “blows” given by the engine during gear changes. You also need to check that the traces left by the discs on the sides of the bell are not excessively etched.

The driving plate has an area coated with the friction material (which must always be uniform and not excessively consumed) and a type of “tooth”, without friction material, which is the contact surface between the plate and bell (that must not show signs of deformation).